DIY Toy Ghost Costume
This week Riceananas wants to show you how to make a scary ghost costume for your Ricemonster plush toys and their pals!
Follow the simple steps below to make your own DIY toy ghost costume!
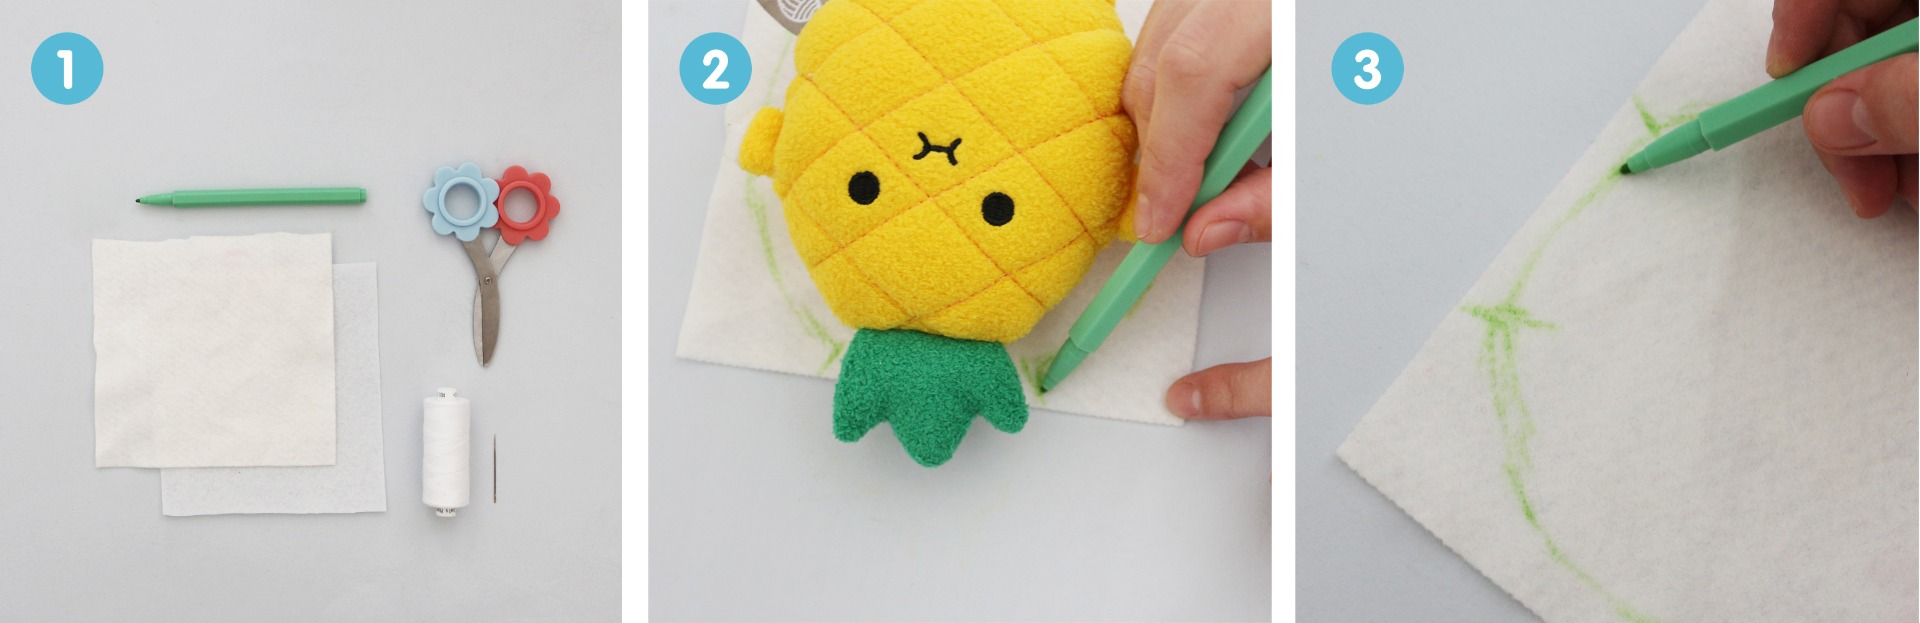 Step 1: You will need two pieces of white felt larger than the toy you are making a ghost costume for, a pair of scissors, a pencil or pen and some white string and a needle.
Step 2: Start by placing your Noodoll toy on top of your first piece of felt. Draw around the toy leaving about 1.5-2cm around the edge.
Step 3: Make sure that you leave some space for the ears or hair of your plush toy and make a mark on each side.
Step 1: You will need two pieces of white felt larger than the toy you are making a ghost costume for, a pair of scissors, a pencil or pen and some white string and a needle.
Step 2: Start by placing your Noodoll toy on top of your first piece of felt. Draw around the toy leaving about 1.5-2cm around the edge.
Step 3: Make sure that you leave some space for the ears or hair of your plush toy and make a mark on each side.
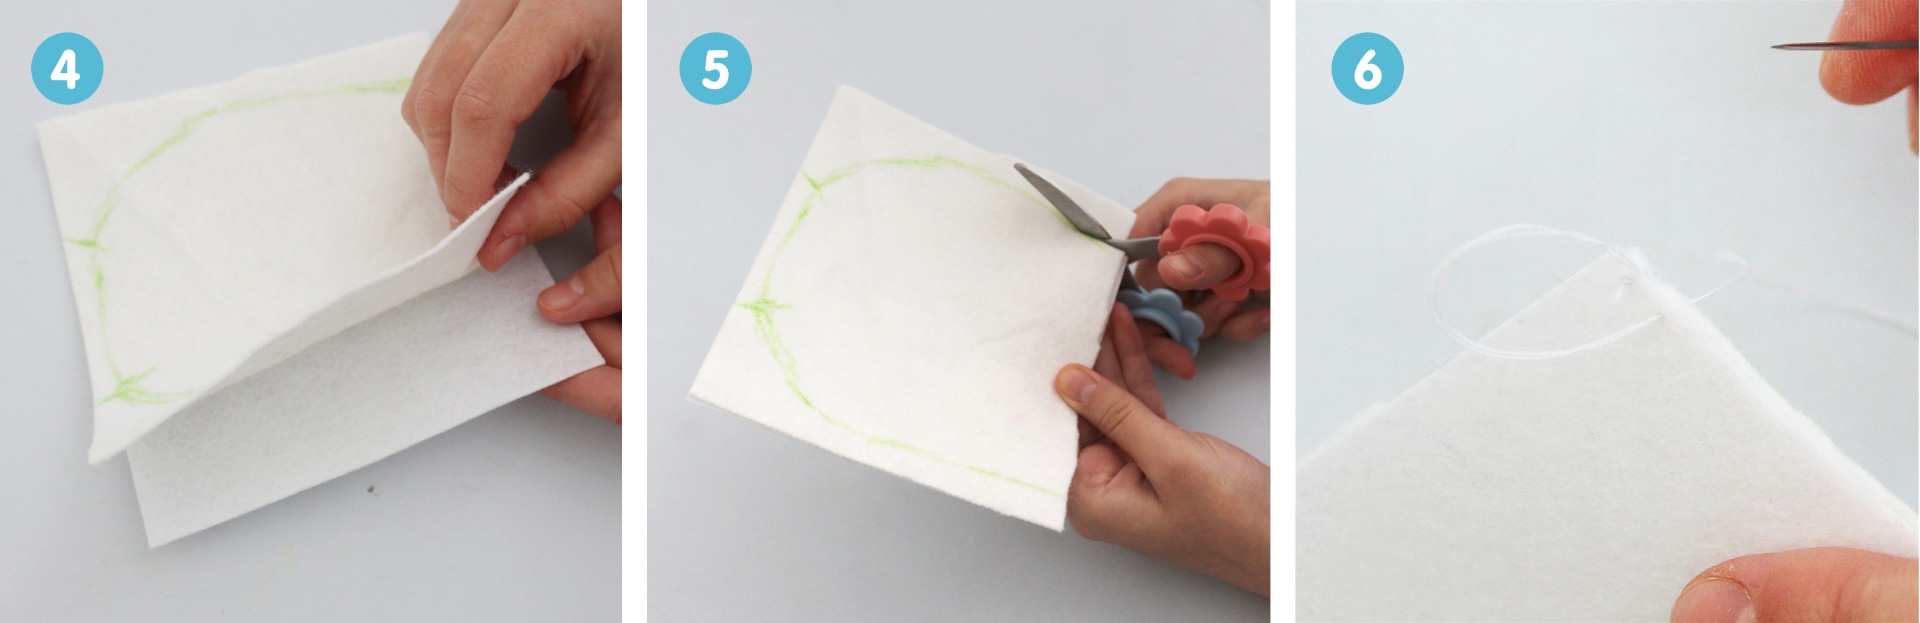 Step 4: Now, place your two pieces of felt together, make sure all the edges are touching! Tip: use some safety pins along the drawn edge to secure the felt together.
Step 5: Once your two felt pieces are secured in place, cut around the line you have drawn on your first piece. Tip: leave about 5mm-1cm of fabric around your drawn line so that you can just follow it when you sew your costume together!
Step 6: Sew your costume following along the line your drew earlier. Make sure to leave the area marked the the ears or hair NOT sewn!
Step 4: Now, place your two pieces of felt together, make sure all the edges are touching! Tip: use some safety pins along the drawn edge to secure the felt together.
Step 5: Once your two felt pieces are secured in place, cut around the line you have drawn on your first piece. Tip: leave about 5mm-1cm of fabric around your drawn line so that you can just follow it when you sew your costume together!
Step 6: Sew your costume following along the line your drew earlier. Make sure to leave the area marked the the ears or hair NOT sewn!
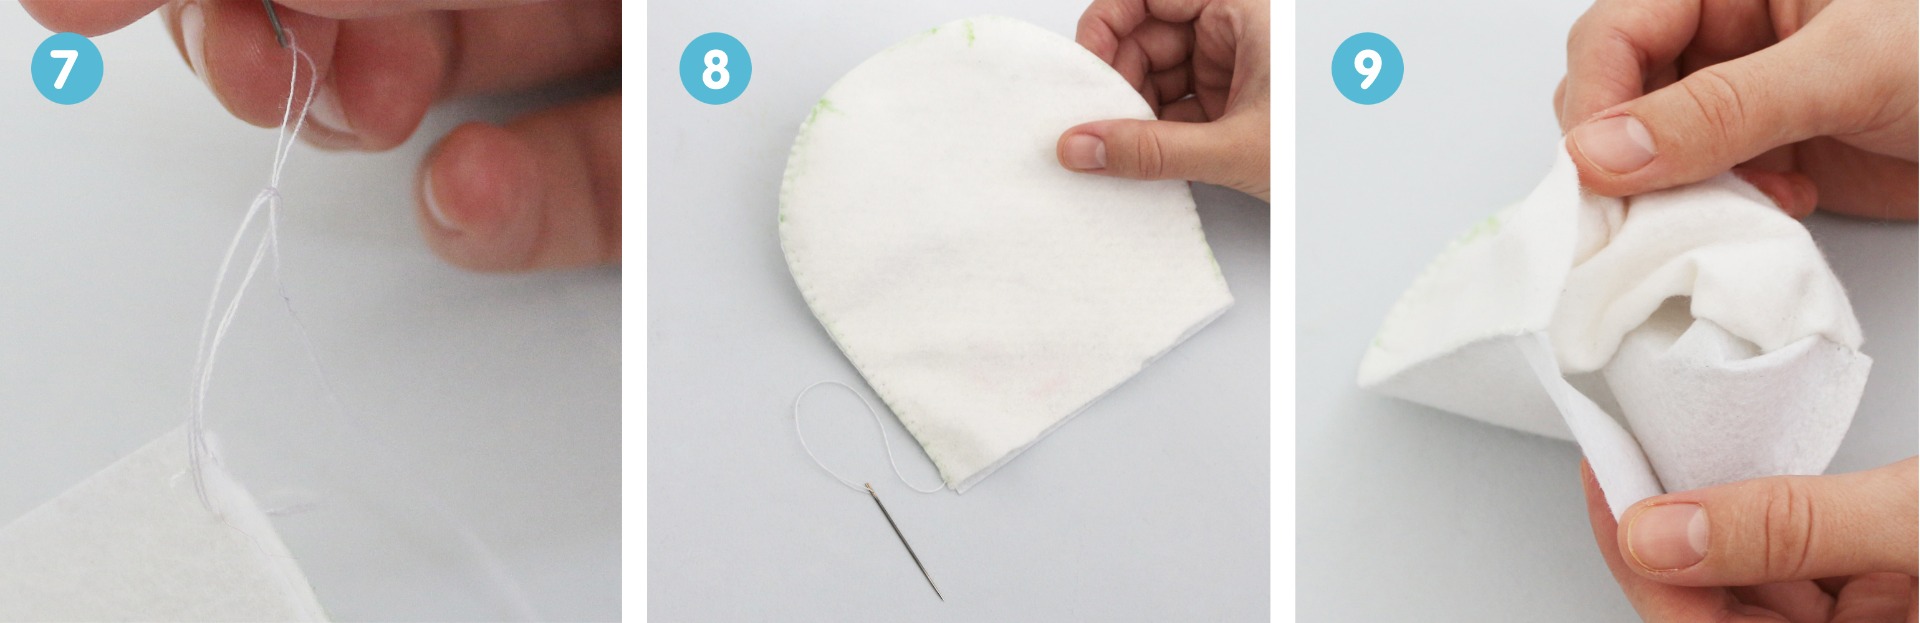 Step 7: Make a small knot on the end once you have finished sewing.
Step 8: Once you have finished sweing your costume make sure that all the seams are sewn tightly, touch up anywhere that you need. You can also carefully cut away any exess fabric along the edges.
Step 9: Turn your costume around inside out to hide away the seams.
Step 7: Make a small knot on the end once you have finished sewing.
Step 8: Once you have finished sweing your costume make sure that all the seams are sewn tightly, touch up anywhere that you need. You can also carefully cut away any exess fabric along the edges.
Step 9: Turn your costume around inside out to hide away the seams.
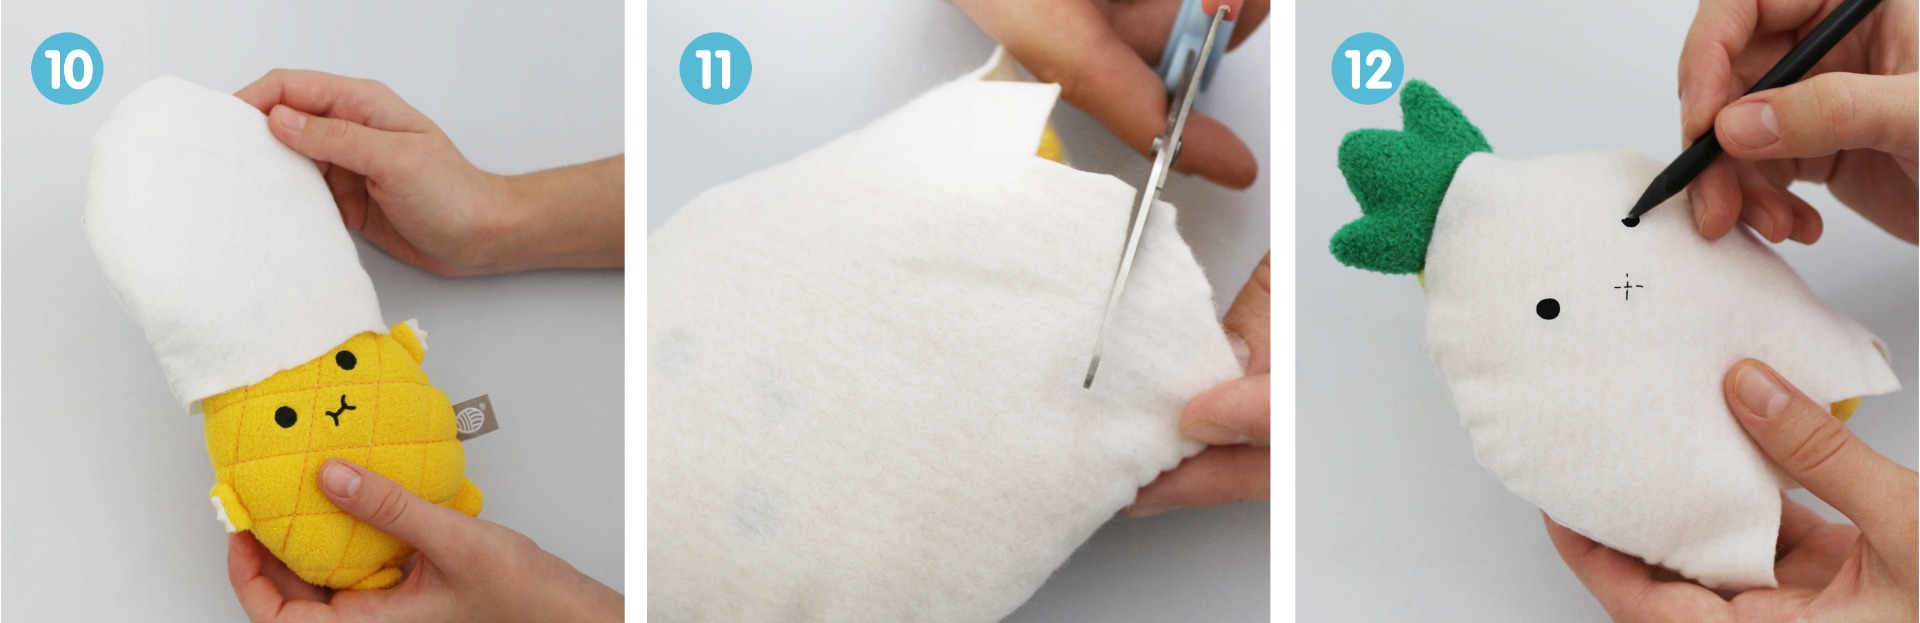 Step 10: Put your costume on your toy.
Step 11: Cut some zig-zags around the bottom or a ghost-like pattern of your liking. Tip: make sure your toy's feet stay hidden under the costume.
Step 12: Finally, draw the face of your toy on their costume. You're done!
Step 10: Put your costume on your toy.
Step 11: Cut some zig-zags around the bottom or a ghost-like pattern of your liking. Tip: make sure your toy's feet stay hidden under the costume.
Step 12: Finally, draw the face of your toy on their costume. You're done!
We hope that you enjoyed making this toy ghost costume. Let us know if you come up with any other Ricemonster dress up designs! Don’t forget to share your DIY projects with us by tagging us on Instagram or Facebook with @ilovenoodoll!
Step 1: You will need two pieces of white felt larger than the toy you are making a ghost costume for, a pair of scissors, a pencil or pen and some white string and a needle.
Step 2: Start by placing your Noodoll toy on top of your first piece of felt. Draw around the toy leaving about 1.5-2cm around the edge.
Step 3: Make sure that you leave some space for the ears or hair of your plush toy and make a mark on each side.
Step 4: Now, place your two pieces of felt together, make sure all the edges are touching! Tip: use some safety pins along the drawn edge to secure the felt together.
Step 5: Once your two felt pieces are secured in place, cut around the line you have drawn on your first piece. Tip: leave about 5mm-1cm of fabric around your drawn line so that you can just follow it when you sew your costume together!
Step 6: Sew your costume following along the line your drew earlier. Make sure to leave the area marked the the ears or hair NOT sewn!
Step 7: Make a small knot on the end once you have finished sewing.
Step 8: Once you have finished sweing your costume make sure that all the seams are sewn tightly, touch up anywhere that you need. You can also carefully cut away any exess fabric along the edges.
Step 9: Turn your costume around inside out to hide away the seams.
Step 10: Put your costume on your toy.
Step 11: Cut some zig-zags around the bottom or a ghost-like pattern of your liking. Tip: make sure your toy's feet stay hidden under the costume.
Step 12: Finally, draw the face of your toy on their costume. You're done!
We hope that you enjoyed making this toy ghost costume. Let us know if you come up with any other Ricemonster dress up designs! Don’t forget to share your DIY projects with us by tagging us on Instagram or Facebook with @ilovenoodoll!